We understand that there are certain circumstances in which you may need to restore your Lollipop Baby Camera to its factory settings, commonly known as a factory reset. We appreciate your diligence in ensuring the optimal performance and privacy of your device.
Here are the steps to perform a factory reset on your Lollipop Baby Camera:
- Preparation: Before initiating the factory reset, ensure that the camera has been plugged in for more than two minutes to allow it to fully power up.
-
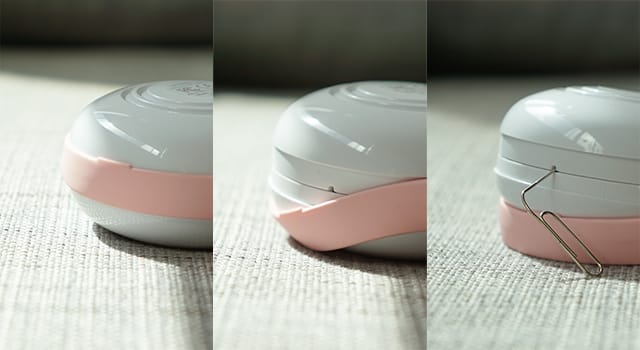
Reset Procedure: In the small hole located below the silicone ring (as shown in the picture), you will find the factory reset button. Press and hold the button using a paper clip or a small needle until the monitor starts flashing red. Hold the button for approximately 5 seconds and wait until the red light stops flashing before releasing it.
- Automatic Reboot: The camera will automatically reboot, and you will see the green light blinking when the process is complete.
- Reconnecting to Wi-Fi:
- Open the Lollipop app and tap the three-dot icon in the upper right corner of the camera view.
- Select "Camera Settings."
- Scroll down and choose "Wi-Fi."
- Confirm your selection by choosing "Yes."
5. Verification: Ensure that the camera successfully reconnects to your Wi-Fi network and that the factory reset is complete.
It's important to note that during a factory reset, only the technical information stored on the camera is reset. Your account, along with photos in your library and other cloud-stored data, will remain intact as long as you log in from your original account.
As a precaution, we recommend backing up your photos and videos before proceeding with the factory reset to avoid accidental loss of valuable data.
🍭Need more help? Tell us how we can help.
Submit a request and we’ll provide further assistance.